Basic maneuvering and maneuvers:
This manual will not delve into the basics of maneuvering your craft, but rather into various aspects of maneuvering your craft in combat including evasive flying. It is assumed that a pilot is familiar with the three axes of control (pitch, yaw, and roll), and the fact that the maneuverability maximum is at thirty-three percent (33%) throttle. The maneuverability maximum is the point at which the rate of rotation along its axes can not be improved.
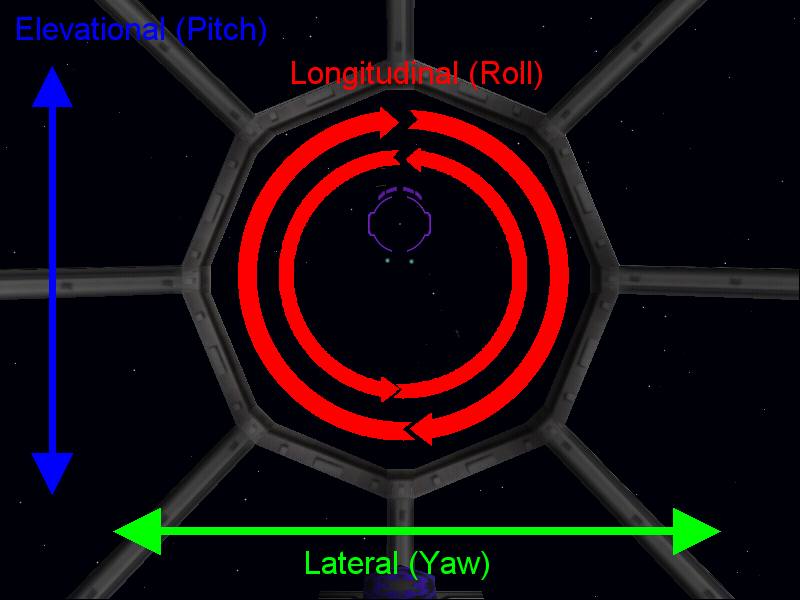
The picture to the side show you the three different directional axis and their corresponding motion in the game. I have not labled joystick axis as the control configuration may differ from person to person. As a brief reminder, the ruuder, "alierons", and elevator control pitch, yaw, and roll respectively. These axes will be referred to as elevational, latteral, and longitudinal control for this next section. The ther "deflection" refers to how far off-center the joystick is. In the case of rudder, or twisting the joystick, it will refer to the rotation of the joystick.
X-Wing Alliance allows a pilot greater flexibility when maneuvering his craft with a 3-axes control system. The primary advantage is that the pilot may orient his craft in a manner that is most comfortable with him. While some pilots may be comfortable following a craft in any direction as it moves, other pilots may wish to orient their craft such that they simply need pull back. This is where roll, or longitudinal control, is useful. Another advantage of having control across all three axes is the ability to coordinate a turn. This is where a pilot "swings" the nose of his craft around to align it with the path of the resultant vector from the combination of longitudinal and horizontal control. This is called "stepping on the ball". This allows the craft to turn with greater efficiency. For example, if a pilot banks to the right and pulls back on the stick, he can increase the efficiency of his turn by using right rudder to align the nose of the craft such that it follows the intended flight path. By doing this, the pilot is allowing more of the effect from the elevator to be directed into the turn.
There are two basic evasive maneuvers that can help a pilot evade hostile fire. Those two maneuvers are the barrel rolland the snap roll In both maneuvers, the craft follows a same basic flight path. However, the difference is in the attitude of the craft as it executes the maneuvers.
Barrel roll:
The barrel roll is the least complex of the two maneuvers, only requiring input from two axes - the longitudinal axis and the elevational axis. The barrel roll is executed by providing longitudinal input (bank/roll) to either the left or the right while including positive (back) pressure on the elvation control. The amounts of control may be varied for evasive flying. However, it is suggested that the back pressure applied be at the maximum allowed. By keeping the back pressure at maximum, the craft changes its position at a greater rate, making it harder to hit. The craft will follow a circular path, rotating about a point not on the longitudinal axis of the craft. The pilot will see any reference item seem to rotate either clockwise or counter clockwise about a point not centered on his targeting reticule. During a barrel roll, the craft will maintain an orientation approximately 90º (ninety degrees) to the direction of motion along the horizontal plane.
The barrel roll may be modified by varying the amount of deflection on the stick throughout the maneuver. This guide will cover one of the variations, the lateral roll, later on.
Snap roll:
The snap roll is the most complex of the two maneuvers, requiring input on all three control axes. However, the only difference between the barrel roll and snap roll in execution is the addition of the third axis. The pilot maintains the same inputs used for the barrel roll and includes lateral control to align the nose of the craft with the path of the roll. The craft follows the same basic corkscrew shape, but the craft's orientation on the curve is along the path of the curve as opposed to the perpendicular alignment of the barrel roll. In effect, the pilot is simply "stepping on the ball" in an extreme pitch/bank situation.
The snap roll has an advantage over the barrel roll in that it allows to you exit on a flight path ninety degrees (90º) to the flight path prior to entering the maneuver, along the horizontal plane of the craft. This in effect, allows a pilot to turn to the right or left while flying erratically.
There are two types of seperate classicfications, resulting in four different types of snap rolls. A snap roll may either be positive or negative and travel to the left or right. Some of these result in the longitudinal and lateral controls being applied in opposite directions.
* Positive left snap roll (left longintudinal, up-elevational, left latera)
* Positive right snap roll (right longintudinal, up-elevational, right latera)
* Negative left snap roll (left longintudinal, down-elevational, right latera)
* Negative right snap roll (right longintudinal, down-elevation, left lateral)
There are also other maneuvers which a pilot can use to evade hostile fire. These maneuvers are difficult to execute because they require the pilot to know the position of craft around them and the craft pursuing them as well as have a strong sense of relative placement. Relative placement is the orientation and displacement of a craft from an initial, or reference position. Ideally, the reference point would be an object fixed in space, such as an idle capital ship, but often, the pilot will have to fixate on an “imaginary” point.
Avalanche:
This maneuver is a modified loop. The pilot enters a standard 360º (three-hundred and sixty degrees) loop. The loop may be either an inside or outside loop in either the positive or negative vertical direction. At the point at which the pilot reaches the 180º (one-hundred and eighty degrees) point of the arc, the pilot then executes a single snap roll to the outside or inside. Once the snap roll has been completed for one complete revolution, the pilot resumes the loop in the same manner as he entered it (inside or outside).
For combat purposes, the avalanche does not need to be executed in full. The pilot may do whatever he whishes after the snap roll. The pilot may also use the snap roll to break in a different direction then that which he entered the maneuver with.
Linear roll:
This roll is a difficult maneuver to execute at first but if executed properly, can be difficult to follow. The maneuver employs the basic barrel roll. The linear roll is most commonly seen being executed to the sides as a lateral roll, but may be executed in any direction. For this course, we will cover the lateral roll with the pilot rolling out to the right. The pilot enters the standard barrel roll, rolling at whatever rate of bank and pitch he desires. It is recommended that the back pressure on the stick be fairly heavy - at least 50% (fifty percent), but not “at the stops”, the point at which the stick may no longer be moved back. One the craft has traveled a quarter of the roll, 90º (ninety degrees), the pilot reduces deflection to the side and either increases or decreases back pressure on the stick. This is where the linear, in this case, lateral motion takes place. When the pilot removes or reduces the lateral deflection, the craft moves more to the "side" (as seen from behind, relative to the starting orientation). This is how where the roll moves "out". The pilot will continue in this manner as long as he desires. It is advised that you keep this time minimal so you don't enter a predictable path. The pilot then resumes with the remaining three-quarters of the roll by applying the initial amount of lateral deflection and back pressure on the stick.
If a pilot wishes to add intricacy to the maneuver, he may “backtrack” on the underside of the roll, which is at the three-quarters point, 270º (two-hundred and seventy degrees). The pilot eases lateral deflection on the stick. The pilot can then either increase or decrease the back pressure applied to the stick. When the pilot has backtracked to his content, he will then apply the initial amount of lateral deflection and back pressure on the stick.
The pilot may repeat the process as much as he desires. This maneuver can also be used offensively to allow you to drop in behind and opponent in an alternative method to side-slipping the craft. Side-slipping is the use of rudder with opposing lateral deflection to cause the craft to initiate flight to the side.
.: Chapter 3: General Targetting :. |